Making a game for my friend’s retro console
I’ve recently finished work on a small game called “A Very Hard Game.” You can play AVHG here. AVHG is heavily inspired by an old flash game, “World’s Hardest Game”.
AVHG was developed for the GameTank, an 8-bit, retro-inspired console designed and built by my friend Clyde Shaffer. Clyde hosted a game jam in May which inspired me to start work on a game (although AVHG wouldn’t end up being submitted for the GameJam as it wasn’t finished in time and didn’t follow the theme).
I learned a lot through the making of AVHG and I had a lot to say on the process of building a game for a console like the GameTank, so I figured I’d share my thoughts. They might seem a bit scattered, as there’s a bit on the design and planning, a bit on the technical details, and a bit on my reaction to finishing the game. Feel free to skip around if a section doesn’t interest you.
Quick notes on the GameTank
Above I wrote that I “had a lot to say on the process of building a game for a console like the GameTank.” There aren’t many consoles quite like the GameTank! While its hardware is far from esoteric, there’s a lot that differentiates it from it’s 6502-based siblings like the NES.
Perhaps the most notable difference is that the console lacks a device like the NES’ Picture Processing Unit (PPU). Instead graphics are prepared by manually modifying buffers in VRAM. The GameTank uses a simple double buffering scheme, where one buffer is written to while the other is being displayed, flipping buffers every update. Bytes in VRAM directly correspond to the color output to the screen. This means that a lot of palette-based effects common on systems like the NES are not necessarily simple for the GameTank. While this is somewhat unfortunate, the GameTank’s approach does come with some benefits. For one, the programming model is very simple. Rather than needing to consider things like which background layers have which properties in a given mode, all that matters is modifying the current buffer. Also, GameTank games should be less beholden to a grid (which hasn’t been really been taken advantage of much yet).
Aside from the many other technical differences, as a new, DIY retro-console with a relatively small community, the GameTank’s tooling isn’t as fully fleshed out as many more mainstream consoles. This can be really frustrating; as programmers we’ve become accustomed to nearly every language and development environment having fairly capable tools for debugging and understanding a program. However, this does mean that a lot of the low-hanging fruit of development tooling are still ripe for the picking. I enjoyed contributing to the community by making improvements to tooling (I will go into more detail later). If having the opportunity to work on tooling for your game sounds like fun, I’d highly recommend giving the GameTank a try! If your only goal is the creation of a finished game, I would generally recommend working in a more established environment.
Most GameTank games are at least loosely based on the GameTank SDK, a small C codebase writen by Clyde. The SDK provides helpful functions for a lot of common operations, such as rendering sprites, playing audio, and collecting player input. While there is a wiki for the GameTank, it’s currently not the most comprehensive knowledgebase. I would recommend those interested in making a game for the GameTank to already be somewhat comfortable in C, as you will likely have to read through the SDK source or the source of other games. Currently, the best source for help and information is the GameTank discord. While I definitely don’t think discord is the best platform for recording information, there’s a really nice, small community on the GameTank discord that is more than happy to help with questions related to the console.
Game design
I knew that getting basically any game working on the GameTank would be enough of an accomplishment to satisfy me, so I decided to make a very simple game. While I don’t remember exactly, I believe I was going through a bit of a phase of nostalgia for flash gaming, so “World’s Hardest Game” (WHG) was on my mind. While this was never my favorite flash game, I always loved its absolute simplicity. Many aspects of the game would simplify development and reduce the amount I needed to worry about performance. Some such helpful aspects:
- The minimalist art style. This was a major driver towards my deciding to make a game in this style. I’ve never been capable of sprite work and wanted to limit the amount of collaboration since I was learning throughout this project.
- The entire level is visible at once without the need for scrolling. I like this a lot as it means players can form a plan for an entire level at once. It does have drawbacks in that it greatly limits the maximum size of levels. This is even more of an issue for our game as level elements are larger relative to the screen than in the original. From a technical aspect, this makes rendering much, much simpler (as I’ll discuss later)
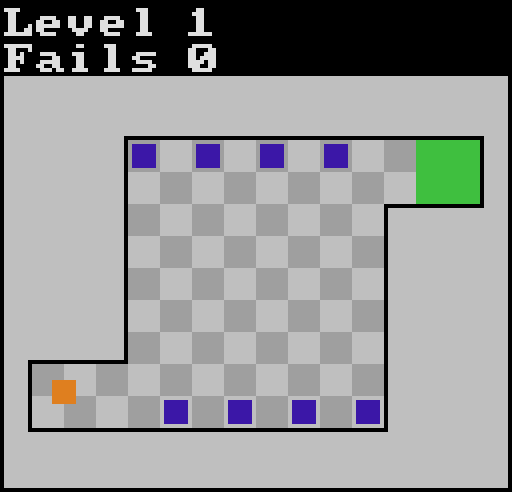
- Levels are quite difficult. Harder levels means players spend generally longer on each level, meaning the game can feel complete with less levels. Combining hard levels with an attempts count can also motivate players to improve and replay levels. Levels which are too hard can turn players off, I think the first level was a bit harder than was reasonable.
- Many entities. I liked a lot of the levels in WHG which had a ton of enemies moving in unison like synchronized swimmers. There aren’t really any GameTank games that keep a ton of entities on screen at once, so I was interested in this as a technical challenge.
I would not, however, consider AVHG to be a direct clone of WHG as they differed greatly on many core aspects
- Enemies always move within bounds and orthogonally. In WHG, enemies commonly move in large circular patterns outside of the traversable part level. Circular patterns would be a bit tricky on the GameTank, plus with the enemies being squares instead of circles these patterns looked off. I feel as though enemies feel a bit more grounded when they only move in the same areas that players can move. This also makes rendering easier for reasons which will be described later on.
- No stationary enemies. Having all of the enemies move in some sort of pattern helps the game feel a bit more alive.
- No checkpoints. Getting rid of checkpoints obviously means one less feature to implement. Aside from that, I don’t personally like checkpoints in already short levels. A lot of the later levels of WHG are checkpoint laden gauntlets, many of which might work better as smaller, self-contained levels. With the screen-size constraints of the GameTank making our levels even smaller on average, I didn’t think checkpoints were a good fit.
- No pickups. Some levels in WHG require players to collect golden coin pickups before completing the level. While these can add an extra dimension of challenge to levels, I thought that they would be more of a complication in AVHG. If I were to make more levels, I might consider introducing a similar system as it would help expand the variety of levels.
- No quips between levels. Between levels in WHG there are messages like “I can almost guarantee you’ll fail” egging on the player. I think these quips are really nice for giving the game some character, but they didn’t fit with the more minimal experience I was aiming for. The overall “vibe” of the two games does a lot to differentiate them.
While I didn’t want to have too much distracting from the core gameplay, there were a couple features added to increase replayability. While developing AVHG, I often kept in mind that it would likely mostly be played at HackManhattan. HackManhattan is a hackerspace that Clyde and I are both members of which has a GameTank on permanent display. Visitors are often very interested in the GameTank. Knowing this, a score table was a feature I definitely wanted to include.

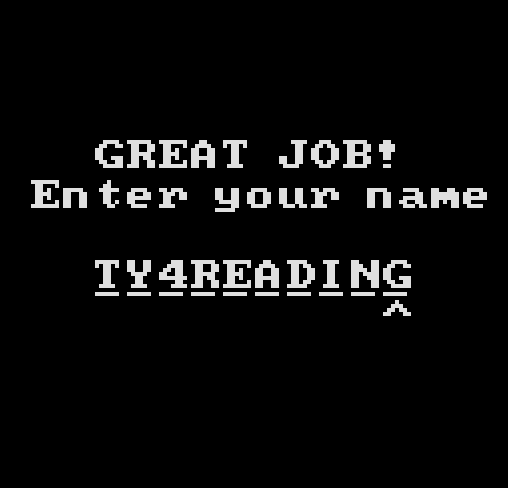
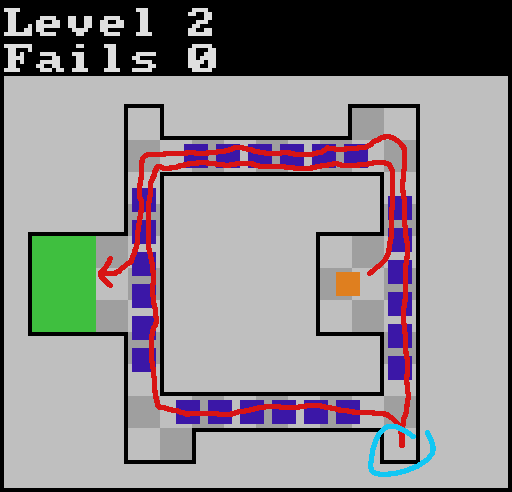
Another feature added to increase replayability was the secret system. If you want to go in to AVHG totally blind I might recommend skipping this paragraph! Each level has a “secret” hidden in a relatively difficult to access location. These are invisible but play a noise and change the color of the goal when passed over. Players who collect each level’s secret receive a special message at the end of the game and have their score entered on a secret score table. This was developed as an economic way to increase the depth of the game and allow players who no longer struggle with the base game to have a sort of hard mode. Secrets can also help to recontextualize levels. I’m especially proud of how level two’s secret reconextualizes much of the level.
A major failing of the level design is the difficulty of level one. Many players bounced off the game after struggling repeatedly on this level. I think that level one is a fair bit more difficult than level two, but I didn’t want to swap the levels for a few reasons. Level one teaches more of the core skills required to beat the game, whereas level two basically only teaches velocity control. I often say that if you can clear level one, you can beat the rest of the game, and I believe this. Level one is also fairly similar in theme to level three, so I would like to separate them to keep the gameplay feeling fresh. I would like to add an easier level to the game before level one so that players can better acquaint themselves with the basic controls of the character. I did make the menu a level but it doesn’t offer much challenge at all or offer enough freedom of movement.
General programming
The programming involved in developing AVHG was very different from most of the day-to-day programming I’m used to. While most of the program was written in C, it was a very different C from the C that you’d write on modern systems. Perhaps the biggest difference is the lack of dynamic memory management. While at times this is constraining, writing a program without malloc or free can actually be quite refreshing. There is also no operating system sitting between your code and the machine to manage hardware or translate virtual addresses for you. I tried as best as possible to avoid needing to switch ROM banks during the game. Most of my game was able to fit in the default bank and PROG0, so the only times that other banks were swapped to was when working with audio, loading the spritesheet for text, or persisting score data to ROM. If I were to take on a similar but more ambitious project, this would probably be the area I’d try to improve my knowledge the most.
I also wanted to challenge myself to not write perfect code while making this game. Often I find myself getting caught up in the quality of the code to the detriment of the project as a whole. AVHG didn’t need to be written absolutely perfectly; it just needed to be free of major bugs and run at 60 frames per second. A lot of the entity update code is particularly ugly. I even forced myself to not fix inconsistencies in multi-word file names (hblockgroup.c, BoxPatrol.c, and secret_reward.c for instance all follow different naming styles). The source code is not the product: it is merely an artifact of the product. This is much more true when developing a game in the traditional style rather than a modern, online “lifestyle game” or any other service product (e.g. SaaS platforms). I’m happy that I was able to put the project first and the code quality second.
Batching enemies
I targeted 60 frames per second with AVHG. Once I understood how to best render I didn’t have too much trouble hitting it.
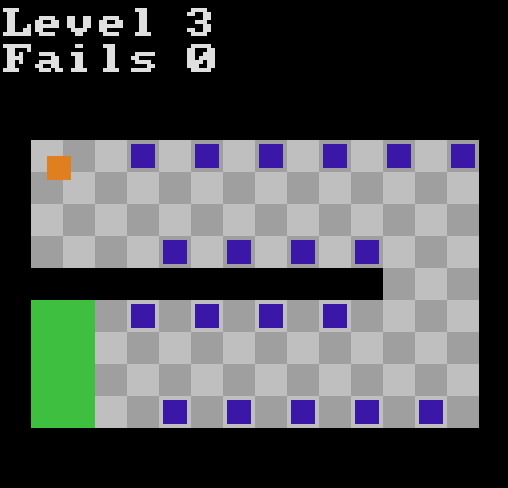
One technique I made fairly heavy use of was “batching” enemies. For instance, in the image below the eight enemies (in blue) are represented as two groups of four enemies each. For the rest of this piece I’ll describe the batched groups of enemies as entities (these are not the same as entities in an ECS sense!). This makes rendering, collision detection, and updating the enemies much faster. They also take up much less RAM, although RAM was never a major bottleneck.
In level two, the 24 enemies which circle the level are actually four distinct entities each comprised of six enemies. They move in one direction and “teleport” back to the start of their track when they finish moving across it. I’ve given each entity bellow a distinct color to make it easy to visualize the different groups.
Level format
From the start of the project I had planned to only make a small selection of levels (you could say quality over quantity if you were being particularly generous). From the beginning of the project I had decided to not to use any specific level editor. All of the levels are handwritten in C, and look something like this:
const unsigned char level_three[TILEMAP_SIZE] = {
    0, 0, 0, 0, 0, 0, 0, 0, 0, 0, 0, 0, 0, 0, 0, 0,
    0, 0, 0, 0, 0, 0, 0, 0, 0, 0, 0, 0, 0, 0, 0, 0,
    0, 0, 0, 0, 0, 0, 0, 0, 0, 0, 0, 0, 0, 0, 0, 0,
    0, 0, 0, 0, 0, 0, 0, 0, 0, 0, 0, 0, 0, 0, 0, 0,
    0, 0, 0, 0, 0, 0, 0, 0, 0, 0, 0, 0, 0, 0, 0, 0,
    0, 6, 5, 6, 5, 6, 5, 6, 5, 6, 5, 6, 5, 6, 5, 0,
    0, 5, 6, 5, 6, 5, 6, 5, 6, 5, 6, 5, 6, 5, 6, 0,
    0, 6, 5, 6, 5, 6, 5, 6, 5, 6, 5, 6, 5, 6, 5, 0,
    0, 5, 6, 5, 6, 5, 6, 5, 6, 5, 6, 5, 6, 5, 6, 0,
    0, 0, 0, 0, 0, 0, 0, 0, 0, 0, 0, 0, 5, 6, 5, 0,
    0, 0x14, 0x14, 5, 6, 5, 6, 5, 6, 5, 6, 5, 6, 5, 6, 0,
    0, 0x14, 0x14, 6, 5, 6, 5, 6, 5, 6, 5, 6, 5, 6, 5, 0,
    0, 0x14, 0x14, 5, 6, 5, 6, 5, 6, 5, 6, 5, 6, 5, 6, 0,
    0, 0x14, 0x14, 6, 5, 6, 5, 6, 5, 6, 5, 6, 5, 6, 5, 0,
    0, 0, 0, 0, 0, 0, 0, 0, 0, 0, 0, 0, 0, 0, 0, 0,
};

const unsigned char level_three_decor[] = {
    20,
    1, 24, 126, 15,
    1, 39, 6, 74,
    1, 113, 126, 14,
    121, 39, 6, 74,
    7, 73, 88, 6,
};

const unsigned char level_three_entities[] = {
    EntityHBlockGroup, 33, 41, 4, 40, 0, 0xA0,
    EntityHBlockGroup, 41, 65, 4, (unsigned char) -40, 0, 0xA0,
    EntityHBlockGroup, 97, 41, 2, 100, 0, 0xA0,
    EntityHBlockGroup, 105, 105, 1, (unsigned char) -100, 0, 0xA0,
    EntityHBlockGroup, 33, 81, 4, 40, 0, 0xA0,
    EntityHBlockGroup, 41, 105, 4, (unsigned char) -40, 0, 0xA0,
    EntitySecret, 97, 76,
    EntityPlayer,12,44,
    EntityEmpty,
};

const unsigned char level_three_reset_data[] = {
    12,44,
};

const char level_three_name[] = "Level 3";
which corresponds to the following level
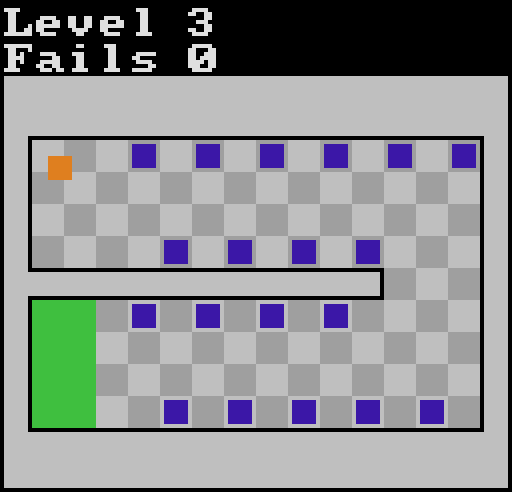
The numbers in the tilemap (above named level_three) refer directly to the color output from the GameTank’s palette. This means that the checkerboard pattern of light and dark gray tiles also had to be added manually.
The list of entities (above named level_three_entities) is terminated by an EntityEmpty. The player is at the end of the list of entities so that it is rendered last. When a player collides with an enemy there is a 12 frame period (duration determined by MAX_DEATH_FREEZE) where the game’s normal update logic is skipped. This helps “sell” the impact and show a player that they have been hit. If the player were rendered under the entity this would look off.
I definitely think that creating a script to generate levels from some other format would have been overkill for a project like this, but if I was making twice as many levels it would probably be due. The decor (which I’ll describe later) is an especially painful process to build manually. The worst aspect of having so much work done manually was not the work itself, but the fact that needing to manually rework everything adds a tremendous amount of friction to the process of experimentation and reworking built levels. I’m glad that I did not let my need to automate everything get in the way of just making something, but I am curious what sorts of levels I would have built with a more expressive set of tools.
A note on rendering functions
In gt/drawing_funcs.c there are a number of helpful drawing functions such as draw_box.
void draw_box(unsigned char x, unsigned char y, unsigned char w, unsigned char h, unsigned char c) {
    if(x > 127) {
        return;
    }
    if(y > 127) {
        return;
    }
    if(w == 0) {
        return;
    }
    if(h == 0) {
        return;
    }
    while(queue_count >= QUEUE_MAX) {
        asm("CLI");
        await_drawing();
    }
    if(x + w >= 128) {
        w = 128 - x;
    }
    if(y + h >= 128) {
        h = 128 - y;
    }
    asm("SEI");

    rect.x = x;
    rect.y = y;
    rect.w = w;
    rect.h = h;
    rect.gx = 0;
    rect.gy = 0;
    rect.b = bankflip;
    rect.c = ~c;
    queue_flags_param = DMA_COLORFILL_ENABLE | DMA_OPAQUE;
    pushRect();


    if(queue_pending == 0) {
        next_draw_queue();
    }
    asm("CLI");
}
While some of the guardrails in the function are nice, they’re really overkill for a lot of purposes. The checks that it does at the start of the method are definitely not free on a microprocessor as old as the 6502. Queueing behavior might not be desired either. This method is fine to use for drawing larger boxes (where the overhead less relative to the work done) or if you aren’t using it in a hot codepath, but for things like rendering the tilemap we can do much better.
The actual drawing in the above function happens through the function call to pushRect. This function is implemented in 6502 assembly, but is relatively simple. It takes the values from rect and moves them into special memory addresses that control the blitter. The GameTank’s blitter is special purpose hardware which can copy data from sprite RAM into video RAM at a rate of 1 byte per cycle. This is tremendously fast compared to copying data manually using the processor. In AVHG, I don’t need to worry about the source as all of my draws are single color (except for rendering text).
Although draw_box is far too slow for our purposes, there’s a faster alternative called draw_box_now. draw_box_now eschews the checks and queueing to immediately write its arguments to the addresses which control the blitter and start the blit:
void draw_box_now(char x, char y, char w, char h, char c) {
    *dma_flags = flagsMirror | DMA_COLORFILL_ENABLE | DMA_OPAQUE;
    vram[VX] = x;
    vram[VY] = y;
    vram[GX] = 0;
    vram[GY] = 0;
    vram[WIDTH] = w;
    vram[HEIGHT] = h;
    vram[COLOR] = ~c;
    draw_busy = 1;
    vram[START] = 1;
    *dma_flags = flagsMirror;
}
This is much, much faster than draw_box for doing a series of small draws, however we can do better still.
When rendering the tilemap, we can use our knowledge of the problem to reduce the amount of work which needs to be done. For instance, each tile is 8 pixels wide and 8 pixels tall. These values can be set once and then not updated. Only the color of the tile and its x position must be updated on each frame, with the y value being updated once each row. We also know exactly how many pixels we’re copying (64) so we know how long the blitter will take (64 cycles as the blitter can copy one pixel per cycle). This means we don’t necessarily need to use any sort of queueing mechanism.
Here’s some excerpts from the AVHG tilemap rendering code:
#define PREP_DRAW_TILE()                      \
    do {                                      \
        *dma_flags = flagsMirror | DMA_COLORFILL_ENABLE | DMA_OPAQUE; \
        vram[VY] = 0;                         \
        vram[GX] = 0;                         \
        vram[GY] = 0;                         \
        vram[WIDTH] = 8;                      \
        vram[HEIGHT] = 8;                     \
    } while (0)

#define DRAW_TILE(x, c)                                           \
    do {                                                          \
    vram[VX] = x;                                                 \
    vram[COLOR] = ~c;                                             \
    vram[START] = 1;                                              \
} while (0)

PREP_DRAW_TILE();

do {
    DRAW_TILE(x, tilemap[i]);
    i++;

    x += TILE_SIZE;
    if (x == TILE_SIZE * TILEMAP_WIDTH) {
	x = 0;
	y += TILE_SIZE;
	vram[VY] = y;
    }

    // NOTE the blitter takes 1 cycle per pixel
    // Without these nops the blitter would not be finished before we start another blit
    asm("nop");
    asm("nop");
    asm("nop");
    asm("nop");
    asm("nop");
    asm("nop");
    asm("nop");
    asm("nop");
    asm("nop");
    asm("nop");
    asm("nop");
    asm("nop");
    asm("nop");
    asm("nop");
} while(i != (char) TILEMAP_SIZE);
Note that we set all of the unchanging blitter parameters once in PREP_DRAW_TILE (Note: GX and GY are for texturing so they aren’t used here). For each tile in the tilemap, all we must do is update the x position, update the color, and occasionally update the y position. The nops are the exact amount needed to wait for the blitter to finish its operation before starting the next. Note that technically less nops are required when we’re setting the y position, but this would require more ROM space for very little performance.
While this provides the largest performance benefit when rendering the tilemaps, it’s used throughout the game. Since enemies are already batched, it’s easy to render a significant number of enemies at once. Enemies which comprise an entity are always the same color and size and generally share either an x or y position.
Reducing Redraw
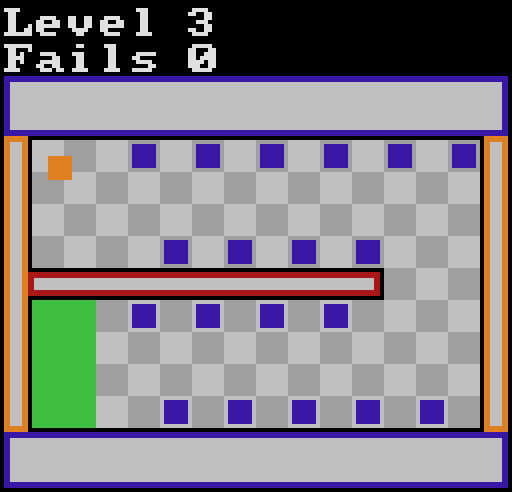
A lot of thought went into reducing the amount I needed to render on every frame of gameplay. Very little changes on any given frame. The first two times a level is drawn (one for each of the two buffers) we perform a “full draw.” A full draw is different from a partial draw in two manners: cells with value zero are skipped in partial draws, in full draws we draw the level decor. Why do we skip the zeroes in partial draws? Zeroes are not traversable by the player and are the outside of the level. Since these areas cannot be reached, they never need to be updated. Drawing them would be wasted effort.
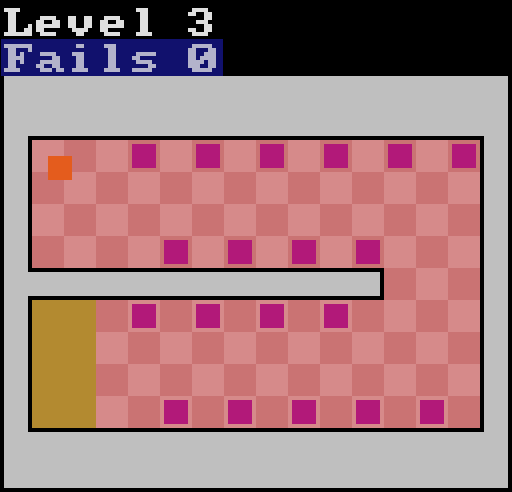
The decor sits on top of the zeroes outside the arena and adds a nice trim to the level. Notice how much less finished level three looks without the decor.
Decor might be a bit to grand of a title given that it’s just gray boxes, but the nice inset from the rest of the level gives it a look I really like. Consider again the definition of the decor from level three:
const unsigned char level_three_decor[] = {
    20,
    1, 24, 126, 15,
    1, 39, 6, 74,
    1, 113, 126, 14,
    121, 39, 6, 74,
    7, 73, 88, 6,
};
This format is very simple, the first char describes how many bytes the rest of the decor is and the next x*4 bytes describe the starting x position, starting y position, width, and height respectively. The code to render the decor is quite trivial:
for (i = 1; i <= tilemap_decor[0];) {
    draw_box(tilemap_decor[i++], tilemap_decor[i++], tilemap_decor[i++], tilemap_decor[i++], COLOR_BG);
}
It would not be particularly difficult to generate the decor values given a tilemap. While I’m generally happy that I didn’t go overboard making tooling for the game, this is one area that a simple script would have made sense.
With all of that considered, the only area outside the main playfield that needs to update during normal gameplay is the fail count (technically I also repaint the word “Fails” for code simplicity), which is updated the two frames following a player hitting an enemy. As such the amount of redraw needed on any given frame looks like this:
I’m not sure if I would have been capable of consistently hitting 60 frames per second without being so aggressive with reducing redraw. At the very least it gave me much more wiggle room in other areas of the codebase.
Audio
All audio output from the GameTank is generated by the console’s second 6502. Calculating audio is a fair bit of work, so this is just about all that this processor has time for on any given frame.
The audio can be divided into two distinct categories: background music and sound effects. The actual calculations the audio-subprocessor has to do for both are the same, but they’re handled somewhat differently by the main processor and the asset generation pipeline. I haven’t talked much about asset generation until now, as AVHG basically only uses it for audio, but it’s actually a pretty expansive topic. Asset generation takes place before compiling, and transforms arbitrary files into headers and data to include in a project. Most other GameTank games use it to store level data and sprites.
Generally you won’t need to worry about these generated files, but here are src/gen/assets/sfx.h and src/gen/assets/sfx.s.asset for completeness
//@generated
//Editing this manually is not recommended, run "make import" instead!
#ifndef ASSETS__sfx_H
#define ASSETS__sfx_H

#define BANK_sfx 131

extern const unsigned char* ASSET__sfx__fail_bin_ptr;
#define ASSET__sfx__fail_bin_bank 131
#define ASSET__sfx__fail_bin ASSET__sfx__fail_bin_ptr,ASSET__sfx__fail_bin_bank
extern const unsigned char* ASSET__sfx__menu_bin_ptr;
#define ASSET__sfx__menu_bin_bank 131
#define ASSET__sfx__menu_bin ASSET__sfx__menu_bin_ptr,ASSET__sfx__menu_bin_bank
extern const unsigned char* ASSET__sfx__secret_bin_ptr;
#define ASSET__sfx__secret_bin_bank 131
#define ASSET__sfx__secret_bin ASSET__sfx__secret_bin_ptr,ASSET__sfx__secret_bin_bank
extern const unsigned char* ASSET__sfx__win_bin_ptr;
#define ASSET__sfx__win_bin_bank 131
#define ASSET__sfx__win_bin ASSET__sfx__win_bin_ptr,ASSET__sfx__win_bin_bank
#endif
; @generated
; Editing this manually is not recommended, run "make import" instead!
.export _ASSET__sfx__fail_bin_ptr
.export _ASSET__sfx__menu_bin_ptr
.export _ASSET__sfx__secret_bin_ptr
.export _ASSET__sfx__win_bin_ptr
.segment "sfx"
_ASSET__sfx__fail_bin_ptr:
.incbin "build/assets/sfx/fail.bin"
_ASSET__sfx__menu_bin_ptr:
.incbin "build/assets/sfx/menu.bin"
_ASSET__sfx__secret_bin_ptr:
.incbin "build/assets/sfx/secret.bin"
_ASSET__sfx__win_bin_ptr:
.incbin "build/assets/sfx/win.bin"Note that the .incbin assembly macro pulls in the actual binary data for the sound effects.
This makes playing sound effects as simple as play_sound_effect(&ASSET__sfx__fail_bin, channel);.
Earlier I noted that the minimal art style was a deliberate choice to reduce the need for external help. I didn’t really have the ability to make the background music myself. I had initially used the song Pressure Cooker from VVVVVV without permission, but when it was decided that I would be selling the game on cartriges this seemed unwise. I reached out to a musician friend, Blackfish, who did a great job putting a track together for me. I gave him some thoughts on the emotions I wanted the player to experience during gameplay and some tracks for inspiration (mostly Amiga Cracktros) but otherwise left everything up to him.
Sound effects and Sound Sculptor
I did take on making the sound effects myself. Clyde had made a tool for building sound effects but it didn’t work in Firefox and wasn’t particularly ergonomic in general. The format for the sound data was quite simple so I decided to build my own tool.
Sound Sculptor is a tool for generating sound effect binaries for the GameTank. It has a lot of nice features and usability improvements over the original sound effect tool. It’s possible to really quickly set a series of values by dragging with one click! Perhaps the biggest additions to the tool are the ability to preview sound effects and the ease of sharing sound effects.
Previewing sound effects works by putting a copy of the GameTank emulator in an iframe and actually having it play the audio via a specially designed ROM. This approach isn’t without its own issues. The emulator has fairly demanding of resources and is super overkill for just playing simple sound effects. Since it lives in an iframe, the user must click into it before their browser will allow it to play audio (currently there is no messaging to indicate this). I had plans to port the audio firmware to javascript which would alleviate these issues, but that is yet to be done. I don’t think it’s the best use of my time right now as, while the current solution isn’t ideal, it works quite well enough.
Sharing sound effects was always technically possible in the old sound effect tool by manually sharing the binary files and loading them into the tool. I’ve simplified this by making it possible to load sound effects based on the browser’s URI. When you make a change to your sound effect it encodes your data as a string and sets it as a URL search parameter. This can be copied really easily to pass around sound effects. Here are all the sound effects from AVHG:
- Fail sound, played when the player collides with an enemy
- Menu sound, played when the player does anything in the menu
- Secret sound, played when the player collects a secret thing
- Win sound, played when the player completes a level. This was the last sound I made and I was pretty tired at the time. I kinda feel like I was just phoning it in on this one it doesn’t feel as triumphant as I’d like it to.
There’s also a channel on the GameTank discord for sharing sound effects, aptly named #sfx_sharing. Previously this would have needed to involve users uploading arbitrary binary blobs, but just opening a link is super easy. If you make something that sounds cool with the Sound Sculptor please share it!
I’ve put a fair amount of effort into ensuring that the data is relatively compressed to ensure that URLs don’t get too long. If you’re interested, please check out the encoder and the decoder. There are a few minor features I’d like to add to the Sound Sculptor, but it serves its purposes for now.
Debugging and Tooling
Debugging issues was probably the most difficult aspect of developing for the GameTank. Forget gdb, even printf debugging is off the table. If your building a game for the GameTank, you’ll probably be running it in the GameTank Emulator. The GameTank Emulator is fairly functional for running games, but leaves a bit to be desired in terms of terms of debugging. When I started working on AVHG, the GameTank Emulator’s code stepper didn’t make use of labels or format instructions well.
Improving the emulator was a nice diversion, and improving the tool wasn’t particularly difficult. I’m glad that things will be slightly nicer for future gamedevs. If you’d like to dip your feet into emulator development, contributing to the GameTank Emulator could be a good place to start. Most of my earlier contributions were UI related. All of the UI for the GameTank Emulator is implemented with Dear Imgui, which I hadn’t used before but found very easy to work in. There are a few larger features which are currently planned but not yet implemented such as save states and TAS replay functionality as well.
Even with my improvements and the improvements I expect to see in the near future, if you’re coming from developing software for modern systems be prepared for a much more limited debugging environment. Even compared to slightly more matured retro game development there’s a bit left to be desired. A few years ago, I did a little bit of work on a SNES game which I emulated with bsnes+. I could see its debugger acting as a guide to improving the GameTank Emulator’s debugging features.
In terms of tooling from outside the GameTank project, the only major tools you’ll need to compile a ROM are Node.js and cc65. Node.js is used exclusively for asset bundling stuff, which I briefly touched on with regards to audio earlier. On the other hand, cc65 will be a major component of your project. cc65 is a C compiler which targets the 6502. I definitely have some issues with cc65, but there’s nothing really worth getting into. At the end of the day, I find it far easier to write in C than 6502 assembly, and it’s easy enough to dip down into assembly if you really want to optimize a block of code.
Building and distribution
While I was fairly pragmatic during development of AVHG, that was all lost when it came to developing the infrastructure to build and distribute the game. I’ve been on a major Nix kick this past year, and I knew that I wanted to host my game on this site, which heavily uses Nix during its build. Getting the ROM building with Nix would ideally make everything super easy, and it shouldn’t be too hard, right?
Building the game with Nix meant having my dependencies ready for Nix. cc65 is the only really unusual dependency, and it had an existing Nix package. Unfortunately, this uses the most recent release of cc65, and due to reasons the most recent cc65 release is quite out of date. Fortunately, building cc65 with Nix is basically trivial, so I was able to set up a flake for building an unstable cc65 version.
The simplest way to build the web shell for AVHG with Nix would be by first building the GameTank Emulator with Nix. As an added bonus, with I could emulate my game with a simple nix run. Without even first installing any dependencies, other Nix users could (in theory) play the game with nix run github:nickgirardo/gt-a-very-hard-game. Writing this Nix derivation was definitely more involved than my simple packaging of the cc65. This is largely due to building the web target. The web version of the GameTank Emulator uses Emscripten to compile the emulator’s C++ source into WebAssembly and a javascript shim. Unfortunately, I wasn’t able to find a lot of information on compiling using Emscripten with Nix. Emscripten’s default behavior is to fetch “ports” of common C libraries from the web during build. This doesn’t really mesh at all with Nix’s hermetic builds. Some packages have specific, hand rolled emscripten versions, such as emscriptenPackages.zlib, but no luck for SDL2. Fortunately, this behavior can be overridden with the use of the environment variable $EMCC_LOCAL_PORTS. A heavily truncated version of the most important parts can be written as:
SDL2_rev = "release-2.28.4";
SDL2 = pkgs.fetchzip {
    url = "https://github.com/libsdl-org/SDL/archive/${SDL2_rev}.zip";
    hash = "sha256-1+1m0s3pBCTu924J/4aIu4IHk/N88x2djWDEsDpAJn4=";
};
EMCC_LOCAL_PORTS = "sdl2=${SDL2}";
There are a few other minor annoyances, such as Emscripten trying to keep a cache in a directory it wouldn’t have access to during a Nix build. This behavior can also be overridden by setting an environment variable. I set EM_CACHE to $NIX_BUILD_TOP/cache (which must be created). Currently, Emscripten and Nix are not great friends, but there does seem to be some effort to improve the situation. I’m hoping that this PR can get some momentum behind it. If you’re looking to see how I handled things, take a look at the derivation gte-web here.
I also made a lot of changes to the GameTank Emulator to make it more straightforward to override defaults with game specific assets. Once these are created it becomes really easy to override defaults and customize the emulator to any given game. The code to build the web emulator specifically for AVHG is now super simple:
web-emulator = GameTankEmulator.outputs.packages.${system}.gte-web.overrideAttrs (final: prev: {
    rom = "${avhg}/bin/game.gtr";
    WEB_SHELL = "${avhg}/web/shell.html";
    WEB_ASSETS = "${avhg}/web/assets/";
    WINDOW_TITLE = "A Very Hard Game";
});

web-emulator-embed = GameTankEmulator.outputs.packages.${system}.gte-web.overrideAttrs (final: prev: {
    rom = "${avhg}/bin/game.gtr";
    WEB_SHELL = "web/embedded.html";
});
The value avhg is the game as built by the Nix, which also exports the web assets for bundling. Note that web-emulator-embed builds the project with a “shell” made for embedding on pages like itch.io rather than standing on it’s own in a webpage designed just for it. With the work I had put in to making the emulator customizable, future changes like this are super trivial.
I definitely put way too much work into all of this, but I found it very enjoyable. A lot of the changes that I made to make it easier to customize my game can be reused by others to simplify their distribution. I definitely learned a lot about Nix through this process. If you’re having a hard time building your Emscripten project with Nix, feel free to reach out! I’d be more than happy to help out as much as I can.
Players and events
It has been a treat to watch players work through this game! As stated before, a cartridge with the game lives at HackManhattan, where it is commonly played by visitors and members. I’ve gotten a tremendous amount of good feedback on the game from these players. A friend of mine, darthbeep, gave me some really good suggestions to improve levels two and four. The feedback that the first level is too hard is probably the most common feedback I’ve received :/
I was also able to take the game to a couple of events! AVHG was one of a handful of cartridges brought to HOPE XV and the Long Island Retro Gaming Expo (LIRetro). At HOPE it sat on the HackManhattan booth, joined by other member-made games as a showcase of member projects. Since we only had one console and television (a Sony Trinitron!), I didn’t want my game to hog the spotlight. I left two of Clyde’s games (Cubicle Knight and Accursed Fiend) on for most of the event. We did have a few players really enjoy AVHG, including one player who made it to the last level before family obligations forced him to leave it unbeaten.
AVHG felt much more at home at LIRetro. It was part of a larger GameTank booth, where I think it helped flesh out the GameTank’s roster as a more fast-paced game with a different art style to the rest of the catalog. The crowd at LIRetro was much more receptive to the GameTank in general as I feel like they had much more of the niche knowledge that makes the GameTank seem as incredible of an achievement as it is. Some players absolutely demolished the game! One player cleared it for the first time in under 50 attempts. Another player noticed upon completing the game that there were high scores, and proceeded to pull off an incredible 18 attempt second playthrough.
I had a great time at both of these events, and would love to go to more similar events in the future!

Selling the game
LIRetro also served as a sort of commercial debut for the GameTank. Relevant for us, as well as selling full consoles, cartriges were also for sale. Clyde had bundled AVHG with Cubicle Knight (see this branch for the details), which I feel is a really great fit. Both games are relatively short on their own, but they bring a lot to the table in their own way. A combo cart also feels like a nice retro throwback to famous offerings of the past, like the classic Super Mario Bros. and Duck Hunt combo.
We actually sold some cartridges! Well, only two AVHG cartridges were sold at LIRetro, which isn’t too bad considering there are less than a dozen GameTanks floating around in the wild. AVHG isn’t exactly sending me to an early retirement, but I was never developing it with profit in mind. In fact, when Clyde offered to sell my game at LIRetro, I had only hoped for only a single sale so I could say that I had earned some money from a game I had developed myself. Ending the conference with double my target sales is definitely a kinder way to phrase things rather than stating I only sold two units.
The Cubicle Knight / AVHG combo cart is available on the GameTank store, as well as a number of other great games and the console itself. If investing $250 to get a retro console isn’t quite in reach, there are also stickers and such.
Completing things
While developing AVHG I felt like I had so much to say that I knew I would one day sit down to pen my thoughts. In many ways, this article marks the true end of development of AVHG. As I’m writing the first draft of this piece, the first commit for AVHG is nearly four months old. The core of the game was finished roughly three months ago. Roughly three-quarters of the time between the start of development and me finally considering the project “complete” was done in support of that core. That isn’t to say that this was three-quarters of the effort; I barely touched AVHG at all during August. I still find considering a project complete to be a difficult emotional undertaking.
When deciding the scope of my game, I believe I did well to avoid something which would require a tremendous amount of effort. During the programming of the game, I was as pragmatic as I’d allow myself to be and valued the completion of the game over the quality of the source code. However, I believe that as I continued working on the AVHG I became more and more attached to it and less and less capable of making the pragmatic decisions I was able to make earlier in development. While I beleive that my work improving the build and distribution system was valuable, and it’s now quite easy for any future GameTank games to customize the web emulator for themselves, that effort didn’t make sense as part of this project. The GameTank Sound Sculptor that I developed is a tool I’m very happy with and (in my opinion) I great step forward from Clyde’s original sound effect tool. However, I didn’t set out to create a sound effect tool, I set out to make a game. Perhaps it was easier for me to fall into these traps as they weren’t tasks I foresaw from the outset.
Closing thoughts
Is developing a game for the GameTank a project you should undertake? While I can’t answer that question for you, if you’ve read up until this point I expect you’d be able to answer for yourself. I definitely learned and grew a lot from working on my game. Completing a game for any platform is a laudable goal, and if that is your goal it might be better to get started with something like Godot instead of learning the inner workings of an 8-bit system. If my warnings haven’t been enough to dissuade you, now is a better time then ever to make a game for the GameTank! The SDK is being updated as Clyde improves the core system while he works on his current GameTank project. LIRetro brought a ton of new people (relatively speaking) into the community. If you join the GameTank discord, folks will be happy to help you along. It’s cliche, but developing A Very Hard Game was a tremendously valuable experience not in spite of the difficulty but because of it.